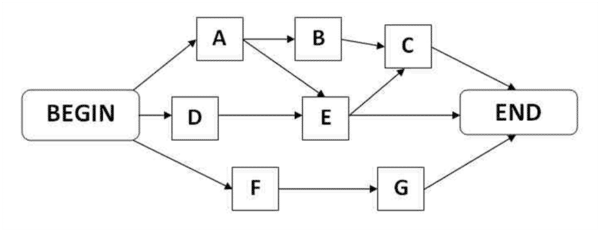
How To Build An Activity Diagram

In Project Management, the importance of CPM Scheduling is immense. This is because it becomes possible through this technique to determine the dependent activities that need to be completed in a sequence and those activities that are not dependent on other activities and can be completed simultaneously.
Through determining the inter-dependencies among activities, it becomes possible to determine the workflow. Hence, the project plan and the sequence in which the tasks and activities need to be carried out become clear and more evident. These are the characteristics that are shown through an Activity network diagram.
Making the activity diagram is the starting point for applying the Critical Path Method. Whether you are applying the method manually or, in case of more complex projects, using a Project Management Software or CPM Scheduling Software, for application of the CPM, the activity diagram is the basic component of the method application and it is after this that the rest of the steps are taken to determine the critical path.

When it comes to making the activity diagram, whether you are using CPM Software or making it on paper, you can start by identifying the activities and tasks that form the project. Start the process of building the activity diagram by making a box for each of the activities in the project. It is recommended that when you are making the boxes, keep all of them the size so that any confusions can be avoided. While each activity has a name and it can be confusing to insert a long name in every box, you can assign each of the activities an alphabet or digit. You can put the name of each activity in the respective box.
After that, you should look at the duration of each of the activities and write it above the box. If you look at the breakdown structure for the project, you will find that each of the activities has one or more activities on which it is dependent before starting. So, after completing the drawing of the boxes, you ought to arrange the boxes in the order in which they need to be completed.
Those activities that need to be completed at the beginning of the project should be on the left side of the drawing and those that can be completed at the latter part should be on the right side. While these are activities that are dependent on each other are in a sequence, and hence, they need to be completed after one another, there will also be those activities that can be performed simultaneously in parallel. In the diagram, these activities should be vertically parallel.
In case you are using CPM Scheduling Software, you can arrange the boxes representing the activities. And if you are drawing the boxes manually, then you can reconstruct the diagram with the activity boxes arranged properly.
After arranging the boxes in the right sequence, you ought to join these boxes with the use of arrows. These arrows are used for showing the sequence of the tasks. In the end, you can also insert a Start and End node so that all the activities start and end at a specific point. This will make it easier for you to perform the calculations in the Critical Path Method. By making the activity diagram, you can be sure to have an organized illustration that gives you insight into the entire project and all the inter-dependencies that exist between the activities.
